
|
|
[Home] [Search] [FAQ] |
|---|---|
| [Private Message] [Register] [Profile] [Member list] [Log-in] |
| Who's Online: |
| There are 0 member(s), and 1 guest(s) online. |
| This thread has 2 pages (1 2) | [Printable Version] [Post Reply] |
| Author | Message |
|---|---|
|
Anon Deleted Posts : Location : Status : Offline |
1977 280 Advantura Restoration Details:1977 280 Advantura Motorhome 2.3 GM Diesel and 5 speed box (retro fitted) 60K miles on clock (engine mileage unknown) Day 1 - Well after getting the thing back a few weeks ago and not being able to even visit the thing for weeks I set aside a couple of days to poke around and see what I have let myself in for!....and the answer is quite a lot but boy am i excited! Having had an extended look around I can say the many years of dry storing have done it so much justice on the cab front. The only metal that is rusty that is of slight concern is the removable plate around the gearstick base and the rest is rock solid, I feel lucky to have a good example and the whole cab is going to be resprayed anyway. Next stop, trying the engine which hasn't been run for at least 3 years although the last tax disk expired in 2008 so I'm guessing it has been longer. The chap I bought it off said he had only tried a new battery and spent 5 minutes on it but no luck. So with some fresh fuel, a new battery and noticing that the fuel pump cold start (advance/retard) arm was disconnected the van breathed into life almost instantly! A tiny bit of smoke and then it sat there chugging away merrily. I was gob smacked, it still had lots of oil in and I was straight away able move it and test the brakes and 1st/reverse which seemed fine. What a great start to the project I thought! .....and then I poked around the caravan walls and oh dear, looks like some bits of it didn't make the journey to 2013 so well! Having searched online it seems i'm not the only CF motorhome owner with a rotten wooden frame and floor. The plan has always been to strip it back and re-insulate and re-seal completely so its a bit more work than I anticipated but then I never expected the mechanics to be in such good nick which will undoubtedly free up time. Luckily I have the space, tools, knowledge (some) and friends to help me do it, so the first port of call has quickly moved from getting it moving to sorting out the rear structure. Thinking of how to approach this structure issue and considering that the thing is standing firm (with help from the cupboards no doubt!) it may be best to replace the major upright supports one piece at a time with a lightweight aluminium frame, so that they now connect to the support legs that come off perpendicular to the chassis. That way it will be much more solid and the thing can remain standing as its done bit by bit - however any advice on this is welcome! At the end of short couple of days i'm chuffed that it runs so well and although the back support structure is an issue I guess it's all just part of the restoration challenge! |
 Sat 09 Mar 2013 @ 22:59 Sat 09 Mar 2013 @ 22:59
|    |
|
Anon Deleted Posts : Location : Status : Offline |
ive got an 82 advantura old son lovely vans though you sound as if youve a bit of work on your hands but as you said you've got every thing you need to do it so good luck old son. 
---------------------- |
Sun 10 Mar 2013 @ 19:52
| |
|
Anon Deleted Posts : Location : Status : Offline |
Parts required. Hi tuscan440.I have been able to get a lot of my parts from an on-line supplier called POPYS OLDSHOP they are based in Norfolk, they have an e-bay site. Doug. ---------------------- |
Sun 10 Mar 2013 @ 19:56
| |
|
Anon Deleted Posts : Location : Status : Offline |
Cheers, it's quite an undertaking but I'm hoping I can get the back structure done and have it resprayed by the Autumn. Thanks for the parts link, I'm having a look now! |
Sun 10 Mar 2013 @ 20:21
| |
|
Anon Deleted Posts : Location : Status : Offline |
....Air filter purchased 
|
Sun 10 Mar 2013 @ 20:32
| |
|
Anon Deleted Posts : Location : Status : Offline |
Hi tuscan,all the best on your restoration. Another thing you can score off your shopping list is a Cambelt kit, as the 2.3 diesel has a timing chain. regards Davie. A Scot Lost in the Valley's. |
Tue 12 Mar 2013 @ 17:43
| |
|
Anon Deleted Posts : Location : Status : Offline |
Wahay how did I miss that! Hopefully the engine done low miles and won't need it replacing! 
Cheers |
Tue 12 Mar 2013 @ 20:11
| |
|
Anon Deleted Posts : Location : Status : Offline |
Hi all Here is a bit of an update of my project, albeit a bit later than planned. First a load of photos just after I bought the van! 
[URL=http://s5.photobucket.com/user/tuscan440/media/Bedford%20CF%20Restoration/IMAG0202_zpsf5bfce35.jpg.html] 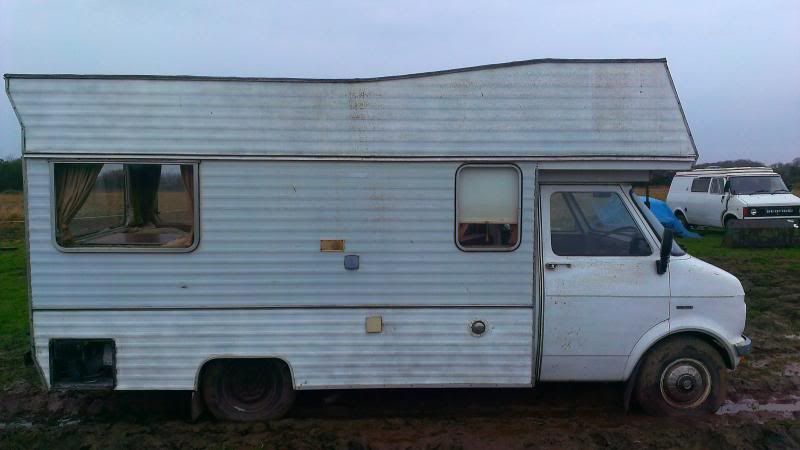 [/URL] [/URL]
[URL=http://s5.photobucket.com/user/tuscan440/media/Bedford%20CF%20Restoration/IMAG0201_zpsb81c2f27.jpg.html] 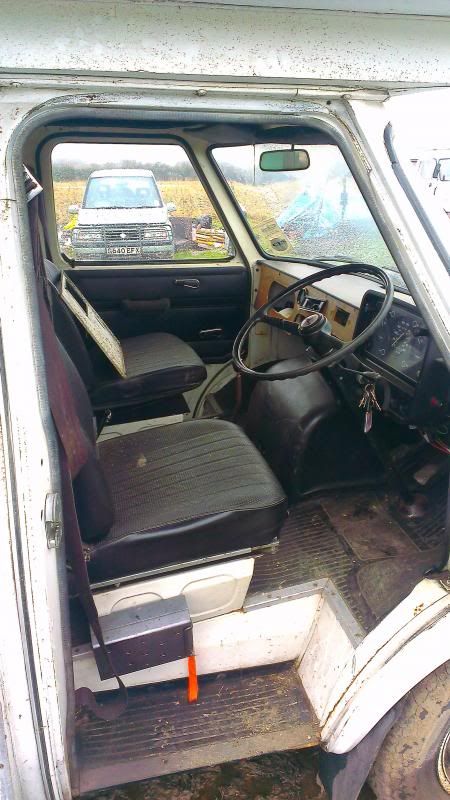 [/URL] [/URL]
[URL=http://s5.photobucket.com/user/tuscan440/media/Bedford%20CF%20Restoration/IMAG0196_zps929d98c4.jpg.html] 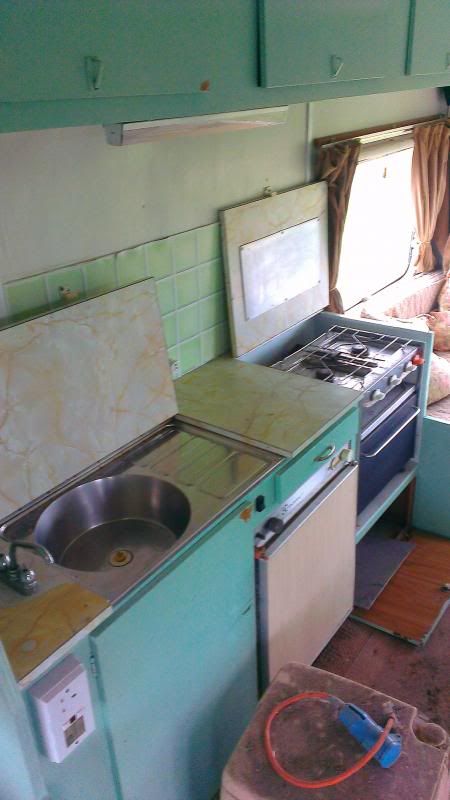 [/URL] [/URL]
[URL=http://s5.photobucket.com/user/tuscan440/media/Bedford%20CF%20Restoration/IMAG0195_zps85a820c5.jpg.html] 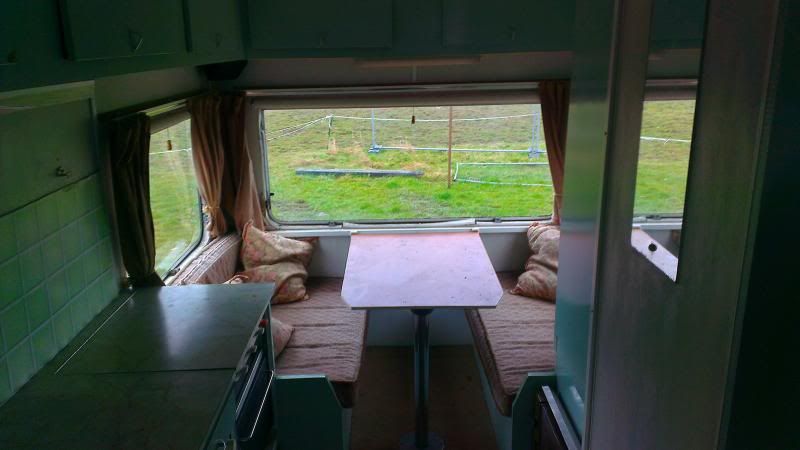 [/URL] [/URL]
[URL=http://s5.photobucket.com/user/tuscan440/media/Bedford%20CF%20Restoration/IMAG0189_zps9662af7e.jpg.html] 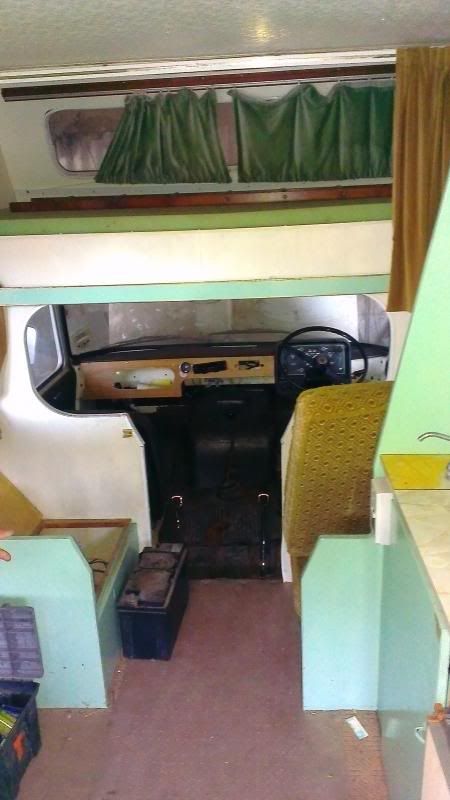 [/URL] [/URL]
[URL=http://s5.photobucket.com/user/tuscan440/media/Bedford%20CF%20Restoration/IMAG0188_zpse00ae769.jpg.html] 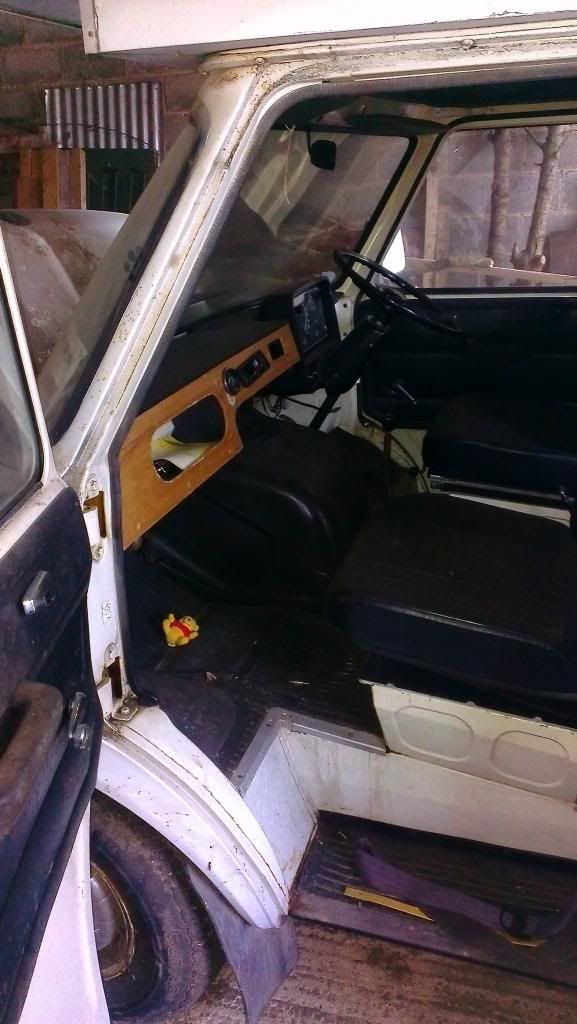 [/URL] [/URL]
I have only managed to get about 6 full days working on the van as it's not located near to where I live but it is progress no less! After getting the engine started I focused on the rear and stripping it out to see what was beneath and to make decisions as I go along with regards to the floor, frame, sealant etc. Having already identified that the wardrobes were doing a good job of holding up the living space I decided to start around the cab area and build the strength from there. One thing that struck me was just how much rot there was! The wooden frame is literally like burnt charcoal in places and falls away without having to touch it. [URL=http://s5.photobucket.com/user/tuscan440/media/Bedford%20CF%20Restoration/IMAG0232_zps7dfe03ec.jpg.html] 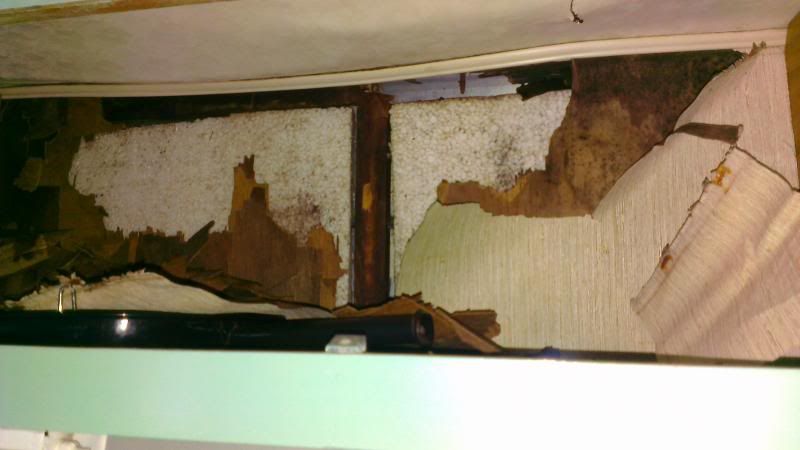 [/URL] [/URL]
The other issue is that pulling off the firm bits of wood and sealant has to be done carefully as any dents made on the inside aluminium skin will show on the outside. So that in mind I started hacking away at the walls, ceiling and floor. It soon became clear that the rotten parts of wooden frame coincided with the screws (mainly roof ones) so the point of ingress would have mainly been around those so something to bear in mind. [URL=http://s5.photobucket.com/user/tuscan440/media/Bedford%20CF%20Restoration/IMAG0263_zps7d3bda3c.jpg.html] 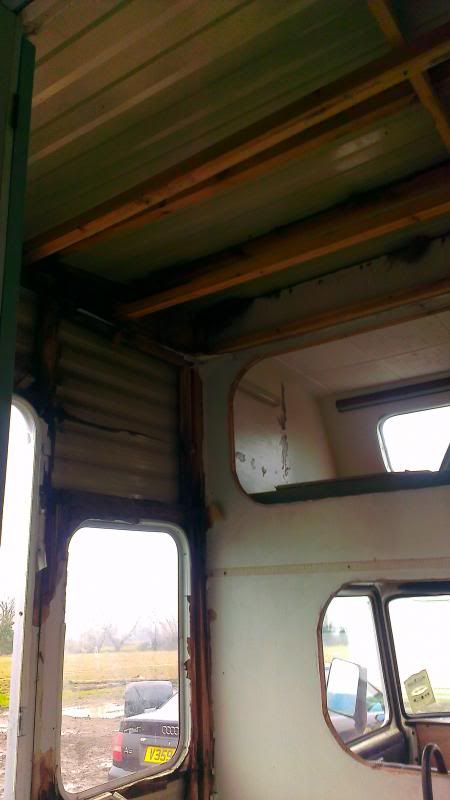 [/URL] [/URL]
[URL=http://s5.photobucket.com/user/tuscan440/media/Bedford%20CF%20Restoration/IMAG0265_zps60dfd23f.jpg.html] 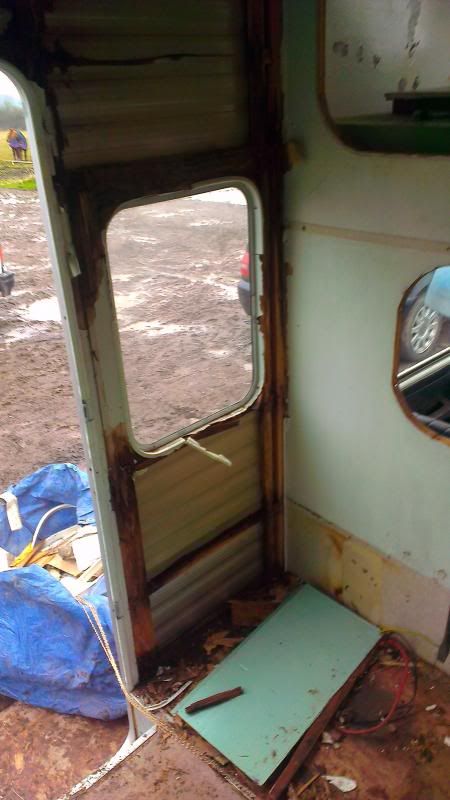 [/URL] [/URL]
I decided to build the strength off of the support legs that come out perpendicular to the chassis. There are about 5 of these in along each side and provide a good way of creating a secure base bit by bit. So after a lot of work I managed to remove the large plywood surround from around the cab. I can appreciate how this will have added a lot of strength to the frame so I have put in a much thicker metal frame than in the rest of it. 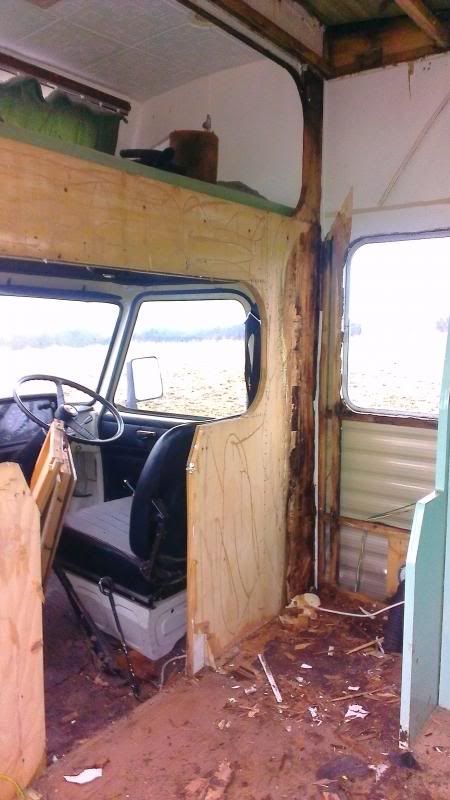 [/URL] [/URL]
In my opinion it is also a massive waste of space. The ceiling does not follow the slope of the roof so several inches are lost and the access to the above cab area is tiny, and now I can finally have somewhere in the van where I can stand upright! (I�m 6ft3�). This leads to the other issue of the bed space above the cab, it�s too small for me to fit in comfortably and the sleeping width (depth of the cab) is only ideal for one person. So the decision has been made that the bed will be spun 90 degrees and it will be extendible outwards to the door frame. This gives me more than enough length (feet don�t hit anything) and lots of bed width so much so in fact that a we can have a 6x4 mattress and a foot depth of cupboard space on each side which also helps with storage. It won�t block the light and this space only really serves one purpose. So basically the ceiling will follow the slope of the roof and the aperture around the cab bed is reduced by about a foot. Here you can see the metal frame going in. Painted in Hammerite. There is only the aluminium skin left of the plywood surround which needs to be trimmed back to give much more space. [URL=http://s5.photobucket.com/user/tuscan440/media/Bedford%20CF%20Restoration/IMAG0345_zps6c8e299f.jpg.html] 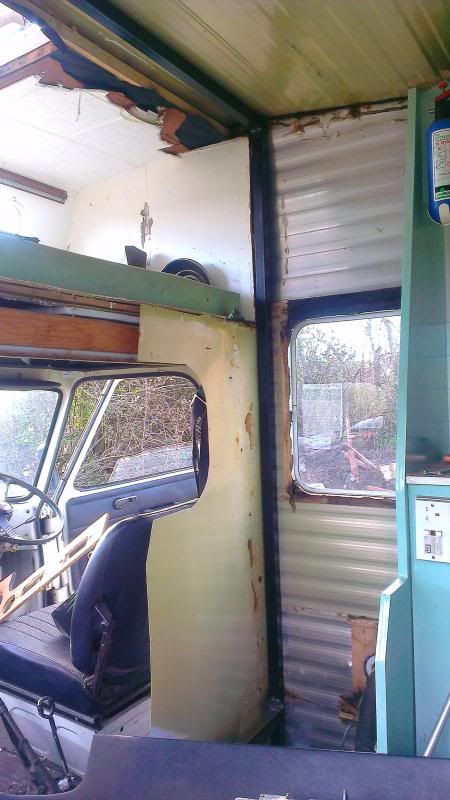 [/URL] [/URL]
[URL=http://s5.photobucket.com/user/tuscan440/media/Bedford%20CF%20Restoration/IMAG0347_zpsa67ef377.jpg.html] 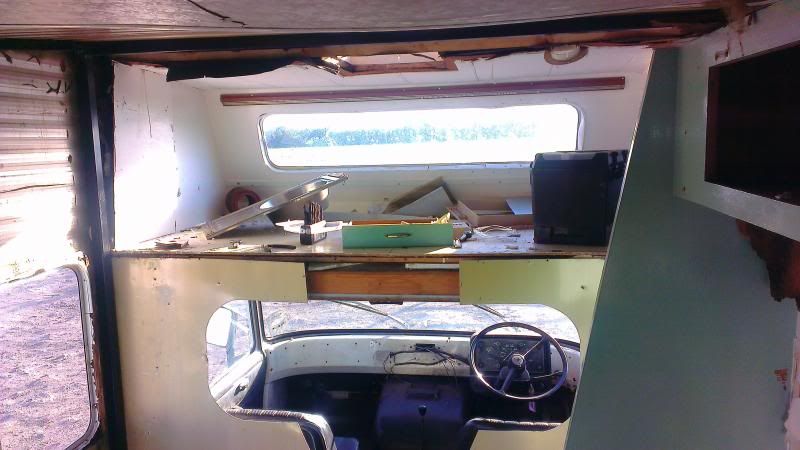 [/URL] [/URL]
1mm box section going in around the door frame, it was very hard to remember that there was no step and I couldn't touch the door frame, I almost ripped off the side a couple of times! [URL=http://s5.photobucket.com/user/tuscan440/media/Bedford%20CF%20Restoration/IMAG0348_zpsed8b5de2.jpg.html] 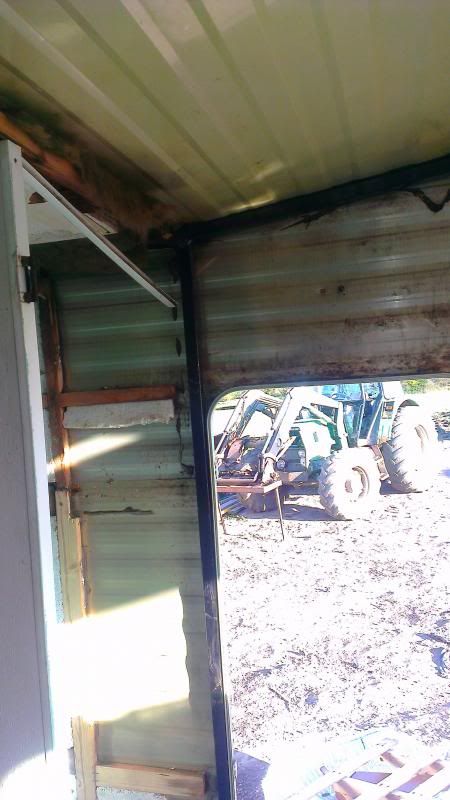 [/URL] [/URL]
The heavy duty step in, seeing how much the van moved on the old rotten step I figured it was best to make sure the seals will not be broken! [URL=http://s5.photobucket.com/user/tuscan440/media/Bedford%20CF%20Restoration/IMAG0349_zps6074bef8.jpg.html] 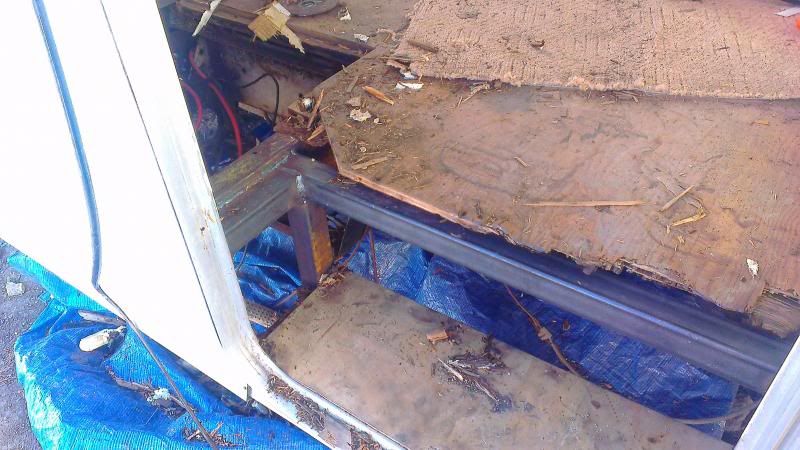 [/URL] [/URL]
old kitchen on its way out [URL=http://s5.photobucket.com/user/tuscan440/media/Bedford%20CF%20Restoration/IMAG0350_zps72fb8503.jpg.html] 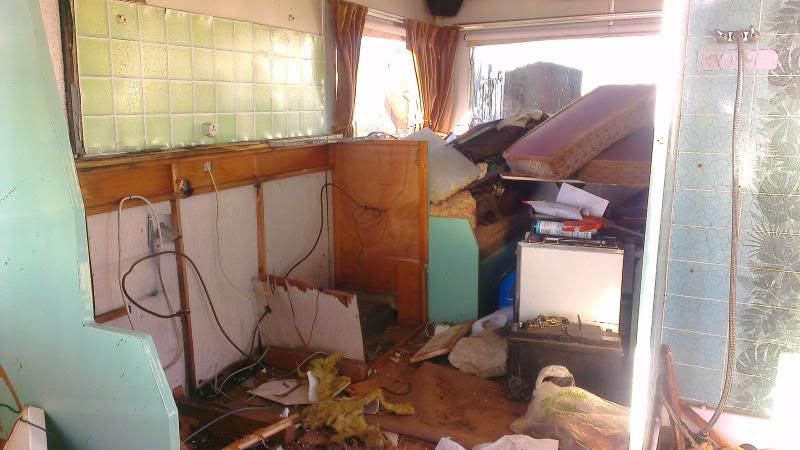 [/URL] [/URL]
Luckily it was a nice long hot weekend, I filled 3 of the 1 tonne bags and I couldn't lift any of them by the end of it (the tractor could) I am surprised at how much weight I removed but then I guess it was designed at a time when fuel was cheap! Frame is now in at two points. and connected [URL=http://s5.photobucket.com/user/tuscan440/media/Bedford%20CF%20Restoration/IMAG0354_zpsaebac7d6.jpg.html]  [/URL] [/URL]
[URL=http://s5.photobucket.com/user/tuscan440/media/Bedford%20CF%20Restoration/IMAG0352_zps787ab221.jpg.html] 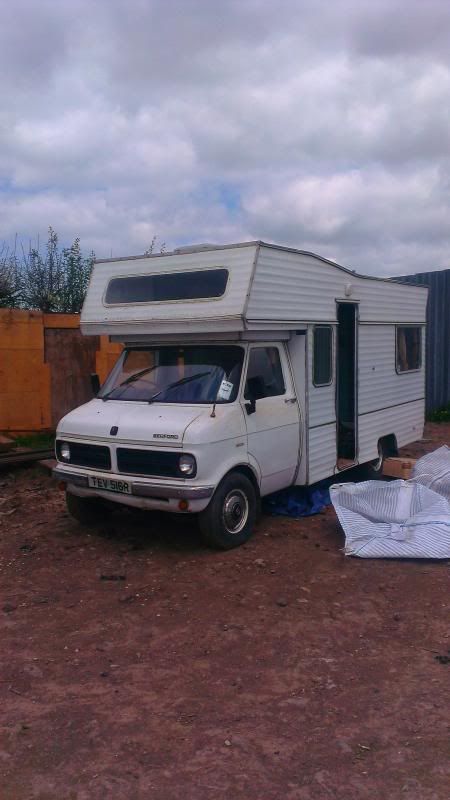 [/URL] [/URL]
[URL=http://s5.photobucket.com/user/tuscan440/media/Bedford%20CF%20Restoration/IMAG0355_zps793d045f.jpg.html] 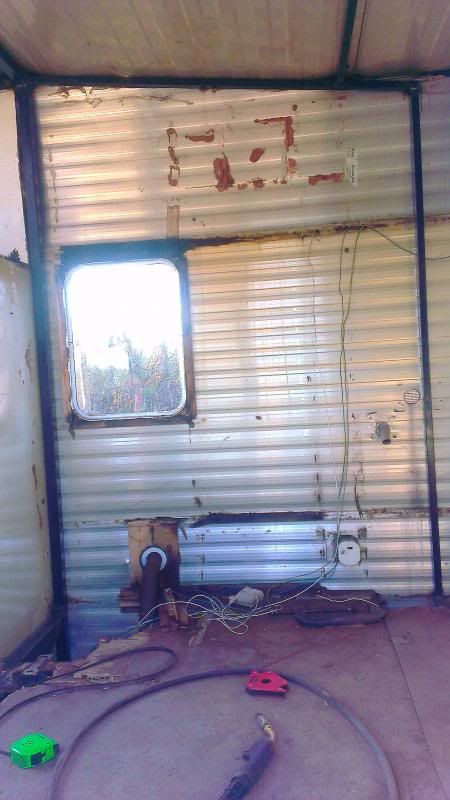 [/URL] [/URL]
[URL=http://s5.photobucket.com/user/tuscan440/media/Bedford%20CF%20Restoration/IMAG0356_zps1d59f706.jpg.html] 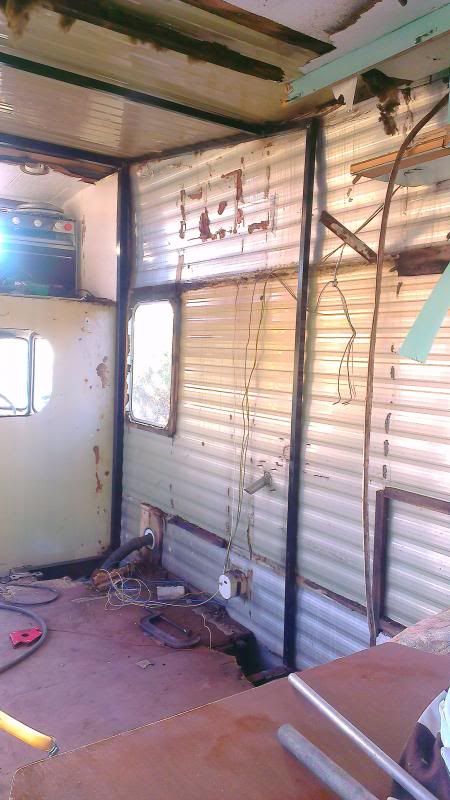 [/URL] [/URL]
Makeshift dash has gone (even that had some rot in it!) [URL=http://s5.photobucket.com/user/tuscan440/media/Bedford%20CF%20Restoration/IMAG0346_zps3a7307a9.jpg.html]  [/URL] [/URL]
That's the result of a few days work, it looks like a mess but a lot of it was figuring out what to do as I go along and now I have a better idea and the thing is secure I can crack on with the rear of it a lot quicker. the skin is temporarily secured with a few drill headed screws so that once the whole frame is I can focus on prepping it for sealant. the only thing that is going to remain in the rear is the aluminium skin, the sponge from the cushions and the table mount....the rest of it is either rotten, broken or seriously outdated. The fridge, oven and sink will make a return at some point but the shower and upright cupboard is gone for good! |
Tue 14 May 2013 @ 00:06
| |
|
Anon Deleted Posts : Location : Status : Offline |
Wow nice job it's great to see someone putting this back on the road. I have a 1980 one of these mine had been stood a couple of years as well, although mine was the oter way round good motorhome body but bad cab . You have the 2.3 gm diesel which is a great strong engine mine just needed fuel and a new primer and battery and away we went. All we have had in 3 years is a brake cylinder starter motor and clutch bearing along with the diff resealed . Just got to start on a reseal of roof this summer. Cheers john ---------------------- |
Tue 14 May 2013 @ 09:57
| |
|
bluebedouin Global Moderator Posts : 2444 Location : Northampton,England. Status : Offline 
|
Cracking job there.
One thing to bear in mind though is the metal you're putting in.Take that into account when you consider the gross weight of the vehicle. ---------------------- |
Tue 14 May 2013 @ 10:07
|


|
|
Anon Deleted Posts : Location : Status : Offline |
Cheers guys, it is certainly a lot of effort but because I have no set time scale i'm not stressing about it and enjoy working on it! Aim is to have it re-framed, sealed (leak tested) and insulated by October when it has to go back outside from under cover (a motorhome cover is on the cards) The metal will be of some weight in total but to be honest I think there are weight saving opportunities elswhere like not having the upright cupboards, less wood around the cab area, double glazed plastic windows instead of glass ones etc. My aim is to keep weight down as much as possible so the frame is thick around the cab and step where it is required and thinner around the rest. Once the insulation, plywood and sealant is in it should be rather sturdy! All of the metal put in so far I could easily lift by myeslf so I think using modern materials and thinking a bit smarter about storage solutions will not make it any heavier (that is my estimate anyway) Whenever I start the engine up I can't help but have a smile on face, it sounds so healthy! Not sure about the brakes though...they will need some attention....maybe even an upgrade to discs on the front if needs be. I don't want my good work being undone by some overtaking-sharp braking numpty on the road! |
Tue 14 May 2013 @ 12:16
| |
|
Anon Deleted Posts : Location : Status : Offline |
Well I was back on it this weekend, unfortunately due to other commitments I knew that I wasn�t going to be able to work on it for a couple of months so it was good to be back on the tools! To be honest I only got in two half days work on the van and I had a mate helping me out on one day but we still managed to get quite a bit done. 
The weather was bloody lovely this weekend and I thought it was a good excuse to crack out the retro 70�s awning that it came with! In the picture we hadn�t yet extended the bottom poles as the wind was making it difficult but it�s a nice little bonus that came with the vehicle and is in good condition too! Check out those tassels [URL=http://s5.photobucket.com/user/tuscan440/media/Bedford%20CF%20Restoration/IMG-20130629-WA0001_zps8f95485b.jpg.html] 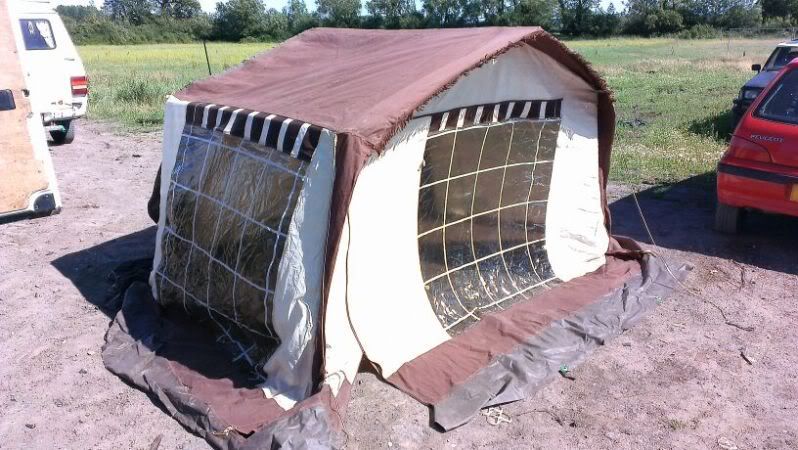 [/URL] [/URL]
The rear of the van was a lot easier to strip out now we had a lot of strength around the door, step and cab so it wasn�t long before we had the whole of the back out and wow does it make a difference! Sure it will look smaller than this again but the upright cupboard and shower were so imposing on the space and to be honest quite a waste of space. We are not having any floor to ceiling units and this will completely open up the look of the van. We are missing a bar in the top right hand edge running to the door as I didn�t have a painted metal piece available at the time but it will all be done soon. Although we (my gf and I) have yet to decide exactly on the layout I think it will stay relatively similar but with a better designed kitchen unit and with more seating by extending the seat to where the cupboard was and having the option of making the sofa section into a u-shape sofa (I will upload plans in the coming months). The plan is to make every bit of storage count so underneath the van where there is space (water tank, bit adjacent to door) we will have storage containers only accessible from the inside. Also the gas heater for the shower is a load of dead space now so that will now house the gas bottle for the kitchen appliances, putting it there allows us to remove the oven/grill and to cook outside the van when we desire! [URL=http://s5.photobucket.com/user/tuscan440/media/Bedford%20CF%20Restoration/IMAG0442_zps7c8b1e39.jpg.html] 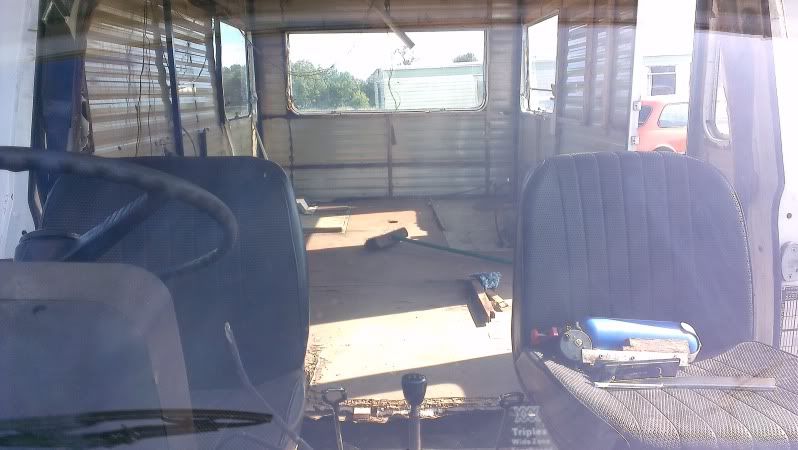 [/URL] [/URL]
[URL=http://s5.photobucket.com/user/tuscan440/media/Bedford%20CF%20Restoration/IMAG0445_zps4a52943f.jpg.html] 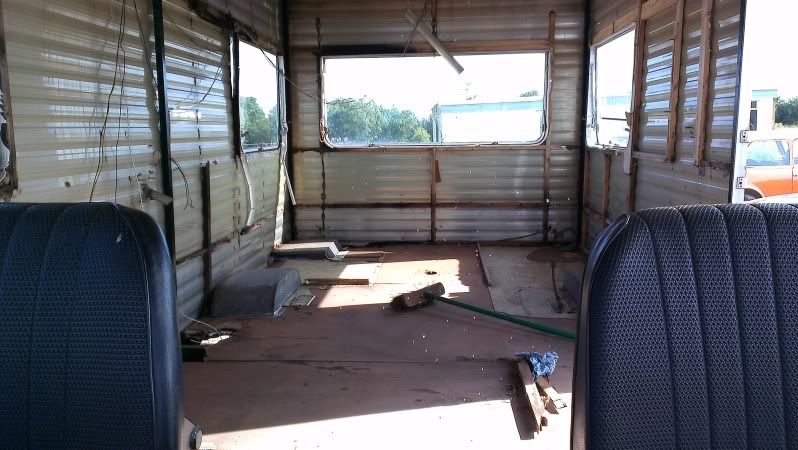 [/URL] [/URL]
I am in contact with a couple of places about sourcing second hand double glazed plastic caravan windows for the van, This will improve the insulation, condensation issues and means they won�t be broken easily. We want clear flat windows so that match the style of it now, any detail such as aluminium trim we can add in at some point. [URL=http://s5.photobucket.com/user/tuscan440/media/Bedford%20CF%20Restoration/IMAG0446_zps00993115.jpg.html] 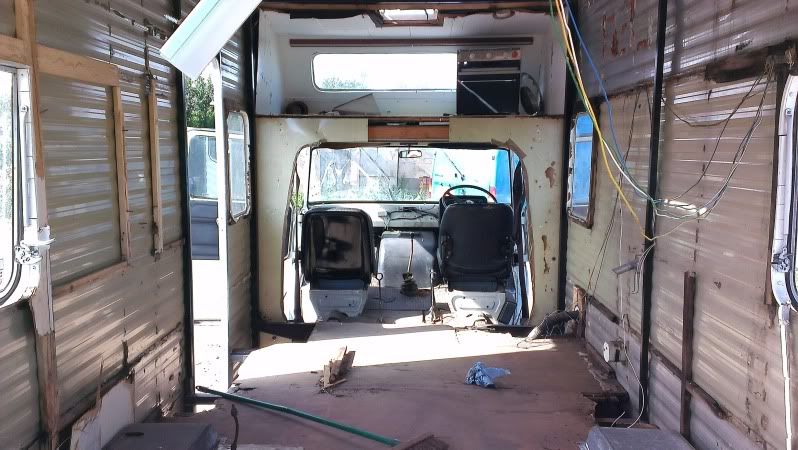 [/URL] [/URL]
Looking forward you can see the major difference by removing the plywood aperture around the cab, this will allows us to make the passenger seat into a captain�s chair (swivel) and I will create an insulated sheet that can pin to what remains of the cab surround so that we can shut off the heat/cold from the cab area. Also one other debate I was having with mates was my dislike for the dashboard. I know some of you may be offended but I can�t understand why such a nice looking van is spoiled with a plastic box for the dash. It is the only (obvious) piece of plastic in the van and I think a much nicer metal dash would suit it so I am on the lookout for this style Bedford CA speedo unit/dash. I am hoping the dimensions will match up well enough so that it blends in well. (no idea about gearing on speedos and clocks but im sure it can be solved somehow). [URL=http://s5.photobucket.com/user/tuscan440/media/IMG-20130630-WA0000_zps4a4115c6.jpg.html] 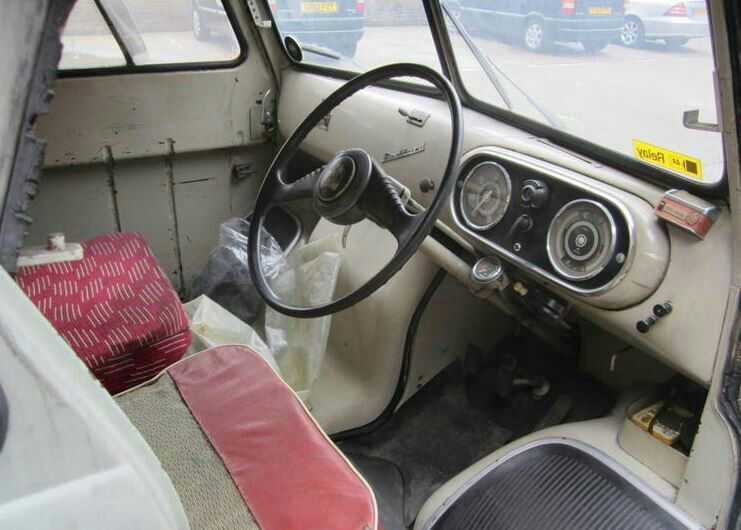 [/URL] [/URL]
I am close to having the whole interior stripped out and the frame won�t take too much effort to get back in before we have to start prepping for the sealant (Sikaflex). I hope to get in another 4 days this month and many more the months after. I am going to need it if I to get this old girl sealed and water tight by October! 
|
Tue 02 Jul 2013 @ 20:45
| |
|
Anon Deleted Posts : Location : Status : Offline |
Unfortunately I haven't had no way near enough time to work on the van because the urgent need to find a new job which in turn led us to buying or first house so the old girl only has more metal frame in and some of the joints cleared of sealant that's about it. The good thing is that having our own space will overcome the problem of the van being far away. Once the van is sealed it can sit out the back the house and it will come a lot quicker! The race is on because I have booked Oktober fest for me and a load mates so watch this space!.....just don't expect much happen until next year. :/ |
Fri 15 Nov 2013 @ 20:47
| |
|
Anon Deleted Posts : Location : Status : Offline |
wow thats quite a bit of work old son rather you than me but good luck to you im sure youll get her looking great in plenty of time for oct fest
---------------------- |
Sun 17 Nov 2013 @ 22:00
| |
|
Anon Deleted Posts : Location : Status : Offline |
Project blown apart.....literally. It pains me that I am saying this but my project has had a serious setback. Unfortunately due to the recent gale force storms we have had my van has had received some series damage. As mentioned before the van is not held at my own place and so I don't have the guarantee of it having a permanent roof over the top and on a recent night when winds where up above 80mph it was outside (had to make way for horses) and it got ripped apart. The aluminum skin which was the only original part of the coach part was torn from the frame and peeled open like a banana. The workshop where it is placed at also lost part of its roof which was secured attached to an old telegraph pole as the cross beam so it was some major wind force blowing through that night.All I can say is that I'm gutted that the original skin is now scrap. I think the new frame isn't twisted and so the dimensions (and windows) remain the same so there may be scope for a salvage operation but for now I'm going to cover it up, concentrate on my first house until the spring and then come back to it.......Not the greatest end to 2013 

|
Sat 04 Jan 2014 @ 17:45
| |
|
Anon Deleted Posts : Location : Status : Offline |
 man really really feel for you cant find words in fact so sorry to see this man really really feel for you cant find words in fact so sorry to see this
---------------------- |
Sat 04 Jan 2014 @ 19:50
| |
|
Anon Deleted Posts : Location : Status : Offline |
Cheers guy, I'm pretty gutted and feel like a lot of good work has been lost. I'm not giving up on it though unless it's really badly damaged. The plans might have to change for it though. As you can see the place is also flooded at the moment but only ankle deep....we shall see. |
Sat 04 Jan 2014 @ 20:02
| |
|
bluebedouin Global Moderator Posts : 2444 Location : Northampton,England. Status : Offline
|
Frickin' hell,that is one gut wrenching disaster. 
One good thing,you know your framework is solid. 
---------------------- |
Sun 05 Jan 2014 @ 17:17
|
|
|
Colin Birch Admin Posts : 4273 Location : Pontypridd, South Wales Status : Offline 
|
You really do have my sympathy there. You must be gutted 
I assume as it was a project it wasn't insured? ---------------------- |
Sun 05 Jan 2014 @ 18:02
|

|
|
Anon Deleted Posts : Location : Status : Offline |
Yeah it's uninsured and a project I was doing during the spring/summer before I got my first house. I was planning to get back on it come late spring. It might be recoverable and as mentioned, at least the frame stood up to the wind! If I look at it with optimist glasses on, the frame was all cut up and just needed to have the last few bits welded in, whilst the aluminum had a 6inch tear in it, lots of tiny dents and loads of old dried on sealant that I was dreading to have to remove. Maybe it's a blessing in disguise, maybe it's the nail in the coffin! |
Sun 05 Jan 2014 @ 19:02
| |
| Time in GMT | |
| [Post Reply] | This thread has 2 pages (1 2) |
 New posts since your last visit New posts since your last visit |
Administrative Functions: Open/Close/Delete Thread / Move Thread |
 Old post Old post |
Back to the CF-UK Homepage ][ Email CF-UK
Powered by FunkBoard vCF0.74c